---
title: Taking infrared (IR) readings with your Smart Probe - best practices
description: Navitas Safety Help Centre
---
[Skip to content](https://info.navitassafety.com/en/helpcentre/taking-infrared-ir-readings-with-your-smart-probe-best-practices#main-content)
English
Show submenu for translations
- Home
- Products
- Pricing
- Blog
- Company
Open main navigation
Close main navigation
- Home
- Products
- Pricing
- Blog
- Company
- English
Show submenu for translations
- Contact us
Contact us
How can we help you?
- There are no suggestions because the search field is empty.
1. [Navitas Safety Help Centre](https://info.navitassafety.com/en/helpcentre?hsLang=en)
2. [Navitas Digital Food Safety](https://info.navitassafety.com/en/helpcentre/navitas-digital-food-safety?hsLang=en)
3. [DFS Hardware Smart Probe](https://info.navitassafety.com/en/helpcentre/navitas-digital-food-safety?hsLang=en#dfs-hardware-smart-probe)
# Taking infrared (IR) readings with your Smart Probe - best practices
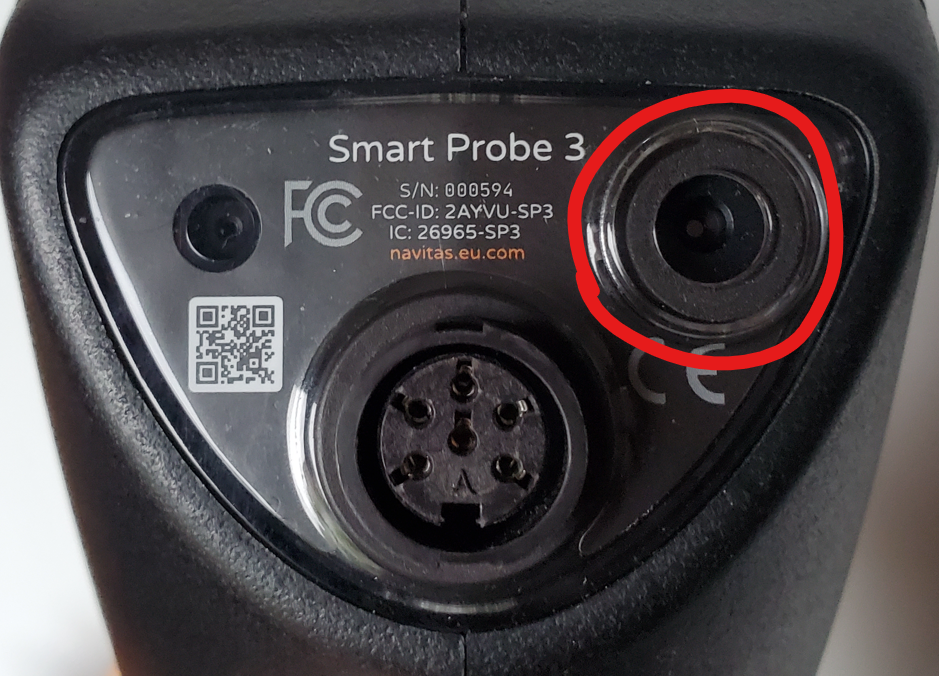
The Probe has an infrared (IR) sensor which is activated automatically when you take the needle out and is found on the back of the Smart Probe opposite the camera as below:
Infrared (IR) thermometers are designed for measuring the surface temperatures of cold foods during delivery or while stored in refrigerators and freezers. **However as per FSA guidance, they should not be used to check the internal temperatures of cooked, reheated, or cooling foods.**
### **First determine the food temperature state**
The IR sensor takes surface temperature readings of an object, whereas the needle, when inserted into food, will take the internal temperature. As such, keep in mind that:
- **Needle** - recommended for hot food (e.g. internal temperature of chicken)
- **IR sensor** - for frozen and chilled food (where in most cases you would not insert a needle)
## Taking readings with the IR sensor
### 1. Distance
You must point the IR sensor at an optimal distance from the food depending on its size because the sensor has an angle of view (similar to the lens of a camera), which means for smaller food items you need to get closer and with larger items you will need to move further away, as illustrated below.
Some examples of rough working distances would be:
- **A steak** - 15cm
- **A gammon joint** - 20-30cm
- **Leg of lamb** - 30-40cm The below shows an optimal distance for a gammon joint 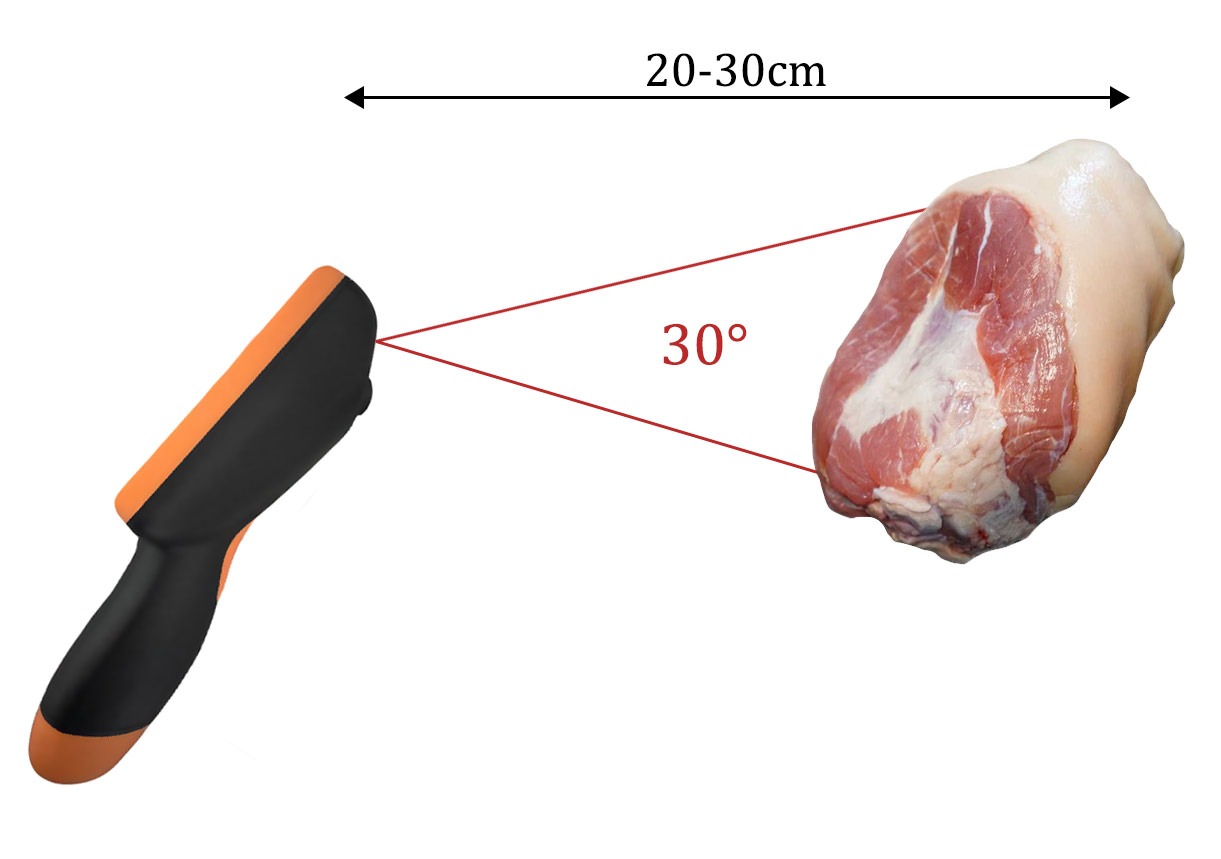
### 2. Angle of the Probe
1. Hold the Probe at chest height and have the screen oriented much like you would when holding your phone - at about a 45 degree angle, parallel to your face.
2. The back plane of the Probe pictured at the top of the article (where the IR sensor/needle/camera are situated) will then be oriented vertical and the IR sensor pointing straight out in front of you.
3. You then hold the food in front of the Probe at the optimal distance, as pictured above **avoiding any reflective packaging or sticky labels, as these can lead to inaccurate readings.**
4. If you obtain a high temperature reading, use a clean, disinfected probe needle to verify the temperature if possible.
### Accuracy and Calibration
A good quality infrared thermometer typically gives an accuracy of within ±0.5 degrees Celsius and a response time of 10 seconds or less. When used correctly, infrared thermometers can provide accuracy comparable to traditional thermometers. The FSA recommends conducting a calibration process on a monthly basis.
Please see the following guide on checking calibration of the IR sensor - [https://info.navitassafety.com/en/helpcentre/smart-probe-infrared-ir-calibration-test-process](https://info.navitassafety.com/en/helpcentre/smart-probe-infrared-ir-calibration-test-process?hsLang=en)
- [Navitas Digital Food Safety](https://info.navitassafety.com/en/helpcentre/navitas-digital-food-safety?hsLang=en#main-content)
- [DFS Hardware Smart Probe](https://info.navitassafety.com/en/helpcentre/navitas-digital-food-safety?hsLang=en#dfs-hardware-smart-probe)
- [DFS Training](https://info.navitassafety.com/en/helpcentre/navitas-digital-food-safety?hsLang=en#dfs-training)
- [DFS Hardware General & Setup](https://info.navitassafety.com/en/helpcentre/navitas-digital-food-safety?hsLang=en#dfs-hardware-general-setup)
- [DFS Hardware Hubs & Appliance Pods](https://info.navitassafety.com/en/helpcentre/navitas-digital-food-safety?hsLang=en#dfs-hardware-hubs-appliance-pods)
- [Navitas Compliance](https://info.navitassafety.com/en/helpcentre/navitas-compliance?hsLang=en)
- [Navitas Academy](https://info.navitassafety.com/en/helpcentre/navitas-academy?hsLang=en)
- [General](https://info.navitassafety.com/en/helpcentre/general?hsLang=en)
- [DFS New Account Setup Checklist](https://info.navitassafety.com/en/helpcentre/dfs-new-account-setup-checklist?hsLang=en)
- [New Releases](https://info.navitassafety.com/en/helpcentre/new-releases?hsLang=en)
- Home
- Products
- Pricing
- Blog
- Company
[](https://www.navitassafety.com/)
[mailto:email@email.com](mailto:email@email.com)
Copyright © 2026, Navitas Safety